
Cooking in a Wood-Fired Oven
There is just something majestic about wood-fired pizza cooking. With no moving parts or electronics to control it, some would say this relic way of cooking would surely be replaced by some modern day alternative but you just can’t. Wood-Fired cooking is so steeped in tradition and produces such an unsurpassed product that there is little wonder why, so many people continue to cook this way.
Using the Wood-Fired oven for the first time can be quite a challenging ordeal. What seems like a simple process takes many attempts and getting that perfect flame can seem near impossible, but we will explain the different types of heat, which are necessary to make that perfect pizza.
The different types of heat used for Wood-Fired Cooking
- Heat conducted by the firebrick floor
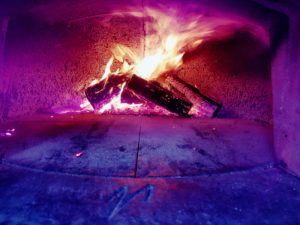
When you place something cold on top of something hot, the transfer of heat is referred to as conduction. A simple way to test if the oven floor is ready for use is to throw a small amount of flour on the tiles. If the flour instantly combusts, you know the tiles are too hot. Although when it takes 2-3 seconds to burn you know you are almost ready to rock and roll. - Radiant Heat provided by the dome
The fierce energy of the fire is absorbed by the rendered clay dome and this heat can be retained for hours. You can usually tell when the oven is ready to be used as the walls of the dome will have turned completely white. - Convection heat created by the flow of the flames
This heat works exactly like a convection oven and helps bake the pizzas, cooking all the top ingredients. This heat is one of the hardest to obtain and usually takes 1-2 hours of burning to be ready. - Direct heat from the intense flames
Constantly feeding the fire is very important. As soon as the direct heat is lost, the base of the pizzas will become overcooked as the top ingredients receive no heat.
It takes a little while to learn, but once you have mastered the flame – the rest is easy!
Farmer Brown’s Pizzas